We wish you all the best as you embark on this journey that will consolidate your International Baccalaureate Middle Years Programme learning and prepare you for the further rigours of Stage 1 and Stage 2 at Good Shepherd Lutheran College.
Objective A: Investigating
Step 1:
Personal Project Mind-map
In your process journal mind-map ideas for your personal project based on your personal interests. Spend time thinking about which product/outcome you would like to create and ensure this is a project that can maintain your interest and enthusiasm for an 8-month duration.
Step 2:
Defining a clear goal
In your process journal outline exactly what you want to create for your personal project and explain how this is based on a personal interest.
Ensure you document the following:
Step 3:
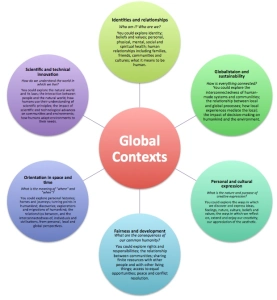
Defining a global context
Select one global context from the six global contexts below that best applies to your project
Once you have chosen a global context, you need to decide on an area of exploration within this global context. An area of exploration is a way to make the global context you have chosen more relevant and specific to your project.
You now need to articulate in your process journal how the global context and area of exploration you have chosen can help you answer the following questions:

Step 4:
Clarifying your goal
Drawing together your initial goal definition based on a personal interest and the global context and area of exploration of your choice, refine your goal using the SMART goal graphic organiser. Ensure you document this in you process journal.

Step 5:
Identification of prior-learning and subject-specific knowledge
In your process journal identify what you already know about the goal for your project, the sources of your knowledge and how this will help you achieve your personal project goal. For example, prior-learning could be a night class, sports clinic, previous training or experience, etc.
Step 6:
In your process journal identify what you have learned from your MYP subject groups that will help you achieve your personal project goal.

Step 7:
Demonstrate your research skills
In order to effectively achieve your personal project goal you need to firstly research and evaluate the sources you have researched so you can then transfer this research to your actual project.
Research Process
Using the research model below, you need to document your research in your process journal.
Ensure you have 1 – 3 primary sources and 4 – 8 secondary sources.

Ensure you copy/print your sources and ensure they are all documented in your process journal – see exemplar for example of how to do this effectively. (See process journal exemplar – Criteria A – for example of how this information can be documented.)
Ensure you highlight relevant sections of your sources and annotate how you can apply this to your product/outcome.
Step 8:
Evaluate sources
Each source you research you must ensure you evaluate this source using the process on the following page.

Authority – Who is responsible for presenting this information?
Accuracy – Is the information accurate, can it be proven and verified?
Objectivity – Is the information based on facts, things you can observe or based more on opinions and emotions? Is it from just one point-of-view?
Currency – How old is the information and is this important?
Ensure you document your source evaluation in your process journal. (See process journal exemplar for an example of how you can document this.)
In your process journal ensure you reflect on how your research skills have developed over the duration of the project. Ensure you document how you have shared your research skills to help your peers as they progressed through their projects too.
Here is a video tutorial to reinforce the information above:
Objective B: Planning
Step 1:
Develop criteria for your product/outcome
Now that you have set your goal, defined the global context for your project and completed your research – you need to transfer this into criteria for success for your project.
In order to develop criteria for your project you need to develop a set of specifications for your product/outcome.
When creating your specifications ask yourself the following questions:
You need to create a minimum of five rigorous specifications for your criteria.
When creating your specifications you can consider the following options:

You now need to transfer your specifications in a draft form in your process journal and once your supervisor has approved this, write the final copy in your criteria for success rubric breaking down each specification from excellent to limited. (See process journal exemplar for what the criteria for success rubric should look like.)
Step 2:
Develop a plan and development process
In your process journal create a timeline or Gantt Chart (see personal project exemplar for example of a Gantt Chart) for the completion of your Personal Project.
Your timeline needs to include the following:
As you progress through the creation of your project, ensure you document your progress and how you are keeping to your plan.
(Disclaimer: the process journal exemplar for develop a plan and development process is very limited, you need to expand on this with much more detail.)
Step 3:
Demonstrate self-management skills
In your process journal you need to ensure you document your self-management skills as you create your product/outcome.
The next section of your personal project is to place your goal into action. As you create your product/outcome you need to continuously reflect on and document your developing ability to:
Organisational skills:
Affective skills:
Reflection skills:
In your process journal, document your reflection. Be honest, explain how you have overcome self-management difficulties and reflect on how you can continue to have self-management success.
If you need further information on mindfulness and positive thinking strategies see our College Director of Positive Psychology, Mr Boyce or our College Chaplain, Pastor Andrew.
Here is a video tutorial to reinforce the information above:
Objective C: Taking action
Step 1:
Create a product/outcome in response to the goal, context and criteria
Here is the part of your personal project where you place your investigation and planning into action.
In your process journal you need to ensure you document the creation of your product/outcome. You need to ensure you take regular photographs and annotate these in your process journal.
Step 2:
Demonstrate thinking skills
As you progress through creating your product/outcome you need to document the following:
Step 3:
Demonstrate communication and social skills
As you progress through creating your product/outcome you need to document the following:
Here is a video tutorial to reinforce the information above:
Objective D: Reflecting
Step 1:
Evaluate the quality of the product/outcome against their criteria
For this section of your personal project you need to refer back to your specifications and criteria for success rubric that you created and have been seeking to achieve as you took action to create your product/outcome.
Using a highlighter, highlight in your process journal what you think your product/outcome has achieved against the specifications you have set.
You now need to provide a justification of why you have given yourself the grade against the specification. This needs to be documented in your process journal. If you have not achieved the top achievement levels you need to justify why and explain how you can improve your product/outcome so you can achieve the top achievement level.
Step 2:
Reflect on how completing the personal project has extended your knowledge and understanding of the topic and the global context
In your process journal respond in detail to the following questions:
Step 3
Reflect on development as a learner
In order to respond to this part of your reflection choose at least 2 of the learner profile attributes in the following table and in your process journal reflect on how you have developed the characteristics of the learner profiles of your choice as you have progressed through the personal project.

Here is a video tutorial to reinforce the information above:
Writing your personal project report
(MYP Personal Project Assessment Criteria: Personal Project Assessment Criteria)
Step 1:
Now that you have created your product/outcome and reflected and documented each step of the personal project inquiry cycle, you now need to transfer this information to your personal project report. This is a formal piece of writing that provides a report on the completion of your personal project. The word count is 1500 words to 3500 words.
Using your personal project report graphic organiser you need to respond to each heading using the information you have gathered in your process journal.
Personal project report checklist
To achieve at your very best in the personal project report, ensure you address each dot point in the personal project report checklist.
Criteria A: Investigating
– I give the precise meaning of the goal of my project; I explain “what I wanted to achieve; when, where, how and why I wanted to achieve it”..
– I define the global context that applies best to my project and explain its connection.
– I describe what makes my project personal: the experiences, interest and ideas that make it important to me.
– I identify what I already knew about this topic/project and the sources of my knowledge.
– I outline the research skills I had when I started the project.
– I discuss the research skills I developed through the project.
Criteria B: Planning
– I refer to the criteria I designed to evaluate the project product/outcome.
– I provide evidence of my planning through timelines, milestones or other tools/strategies.
– I outline the self-management skills I had when I started the project.
– I discuss the self-management skills I developed through the project.
Criteria C: Taking action
– I discuss the product/outcome as the result of the process undertaken during the project.
– I outline thinking skills that I had when I started the project.
– I discuss thinking skills I developed through the project.
– I outline the communication and social skills I had when I started the project.
– I discuss the communication and social skills I developed through the project.
Criteria D: Reflecting
– I evaluate the product/outcome against the criteria I designed.
– I identify challenges and the solutions I developed to meet them.
– I demonstrate a deeper knowledge and understanding of my topic and the identified global context.
– I identify how I have developed as a learner (using the IB learner profile as appropriate).
– I discuss my strengths and weaknesses in completing the project.
Step 2:
Ensure you provide a bibliography and an appendix. (See Bibliography guide for examples of how you need to structure your bibliography.)
Ensure you double-check your report for spelling and punctuation errors.
Step 3:
Once you have finished your report, you need to email this to your personal project supervisor for their feedback and when they have responded with feedback you need to update your report according to their feedback.
Submission and Exhibition
Step 1:
You need to submit the following to the MYP Coordinator’s office. On the bookshelf in the office there are alphabetically organised boxes, you need to place the following in the box (ensure all parts of your project are collated into a file of sorts or clipped together):
Here is a video tutorial to reinforce the information above:
Step 2:
The week prior to your exhibition and awards evening, ensure you have pictures, headings, artefacts, etc., organised so when your rostered time comes to prepare your exhibition space you are ready to simply spend 20-minutes preparing your exhibition space.
Congratulations – you have officially finished your personal project!!
*Your final standardised grade will be submitted via Seqta.
References:
MYP: From principles into practice, 2014
Projects subject guide, 2014
Further guidance for MYP projects, 2015
Disciple. Learner. MYP Design and Language and Literature Teacher. NZ Titahi Bay Girl. View all posts by misslauraengland
April 10, 2015Laura,
you have done an amazing job in synthesising the PP experience. Not only have you made it engaging and meaningful by allowing for students’ voice, but you have also elevated the value of the experience by including resources for each stage of the process. I cannot think of anything more thorough.
What I love the most about the post is that it talks to students and how it encouraged them to reach for the best by showing them the what and how.
I am preparing my ATL in PP presentation for grade 9 (MYP 4), and I want to thank you for helping me think of a way to do it. I will make sure to share.
Gracias. Like Like
Thank you. You are more than welcome to use all the resources. I’m currently planning our Marvel themed Year 9 Personal Project Inquiry Day. Our quest: the acquisition of knowledge and the preservation of academic honesty. Should be oodles of fun 🙂 Like Like
misslauraengland says:Reblogged this on misslauraengland and commented: Updated step-by-step guide to completing the MYP Personal Project. Like Like
Annette says:Your website is amazing and has been a great help to our school as we have updated our PP handbook. Thank you so much for the permission to use your resources! In the last section of the guide you refer to a ‘personal project report graphic organiser’. Would you mind sharing that? akaaras ‘at’ desertacademy.org Again, thank you so much for your engaging and thorough work! Like Like
misslauraengland says:Sorry for the late reply – I’m just learning how to use WordPress – so far I’ve been leaving comments in the incorrect place. I’ve emailed you the report graphic organiser. It is nothing special – just how our school logo and a general layout. The bulk of the layout is on the blog post here.
Thanks for your positive feedback 🙂
Laura Like Like
This is amazing. I am trying to set up something similar for my students doing their first IB Community Project. Is there any way that you might possibly want to share your format and resources with me? It’s incredible and sure would save us a lot of time. Also, have you set up a template using a google.doc? I’m wondering how much support I give them for their process journal, and how much I let them go it alone to show independence? Any suggestions? jsims “at” sandi.net. Like Like
misslauraengland says: Hi Jenny – sorry, I’m just getting used to this – I have replied below 🙂 Like Liked by 1 person misslauraengland says:Hi Jenny,
Of course – we are so happy to share! We actually don’t use any other resources other than what is on the blog that has been transferred to our College intranet for the students to use. We used to have booklets, but I felt they were restrictive and required too much paper. So all their thoughts, ideas, planning and each criteria step-by-step as listed above goes in their process journals. I have no rule on the process journal – we have some using a Facebook page, Trello page, Wikispace, notebook, Visual Art diary, etc. – we leave it entirely up to them. Myself and our Teacher-Librarian hold 5-6 workshops over the 8.5 month period we give the children to complete the project and these just unpack research skills, ATL skills, reflection skills. Everything else is communicated through the supervisors. This can be tricky – that is why I created this guide as our busy supervisors can easily access and know what is next for the students. Here is a recording of the parent information session that I held several months ago and uploaded to our intranet so parents who were unable to attend can access this: https://www.youtube.com/watch?v=DXM7QdKZo0o
(I really hate public speaking, so please excuse the lack of toastmasters training here). I will upload some samples of last years Personal Project (just need to black out names) to my Google Drive and add you to my circle so you can access. This was our first attempt at the new objectives so – we considered this group our Next Chapter guinea pigs 🙂 I hope this helps a bit. Laura Like Like

Lambrini Koufaki says:
Congratulations, Laura, on this wonderful page! Your students get excellent guidance in the PP. Thank you for making all this available to the MYP community. We are new to the PP project and gaining some insight ourselves before introducing it to students is very valuable. There’s obviously a lot of hard work and experience in this, so once again, many thanks! Like Liked by 1 person